Soil erosion is often caused by strong winds and heavy rainfall—and although these are natural processes, erosion remains one of the most threatening phenomena to the environment.
Soil erosion is the process of displacing the most fertile layer of topsoil. This directly affects habitats, environments, and overall ground health. Today, the condition of growable, arable land is more fragile than ever before with nearly $44 billion spent each year on erosion damage in the United States alone.
But in the midst of this, there is some good news: there are several soil erosion preventive methods that are cost-effective, functional, and practical. Some methods include installing ground cover like trees and shrubs, placing retaining walls, and using geotextiles. One of the most popular erosion prevention methods are straw wattles.
How Do You Install Straw Wattles?
Straw wattles may be large and heavy, but they are relatively simple to install. With a little work and proper installation, you’ll have straw wattles that will benefit your property for years to come.
First, you’ll need the right amount and sized straw wattles you need for your project. If you’re unsure what your project requires, here’s a simple guide on how to calculate the amount you’ll need:
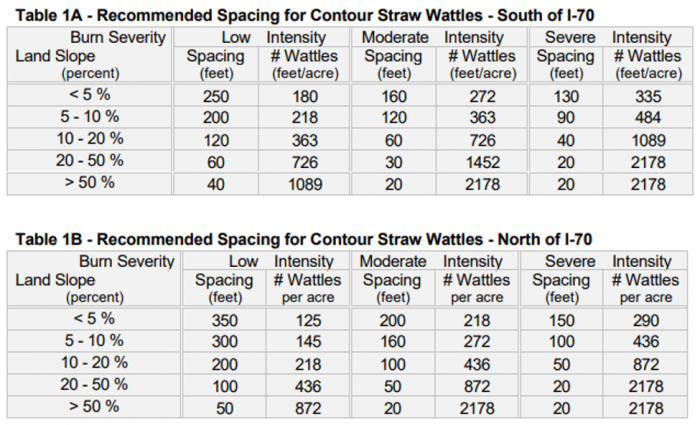
Once you have established how many are needed for your project, you can purchase straw wattles in bulk and get started.
Step 1: Map a Contour Line
A contour line on the land that is of equal height above or below sea level. You’ll want to map and flag your contour line along a slope so that it matches the right distance depending on the slope percentage. Where you place the flags is where you will dig the shallow trenches before the straw wattle installation.
A good rule of thumb is adjusting by the rise and run of the slope, which is the number of feet the hillside drops per horizontal foot:
- (1:1): Hillside drops 1 foot for each horizontal foot = Flags should be 10 feet apart
- (2:1): Hillside drops 2 feet for each horizontal foot = Flags should be 20 feet apart
- (3:1): Hillside drops 3 feet for each horizontal foot = Flags should be 30 feet apart
For this, you’ll want a measuring tape to ensure the right distances. It’s also important to note that soft, loamy soils do better with wattles closer together. Rocky, hardy soils do better with wattles a little further apart.
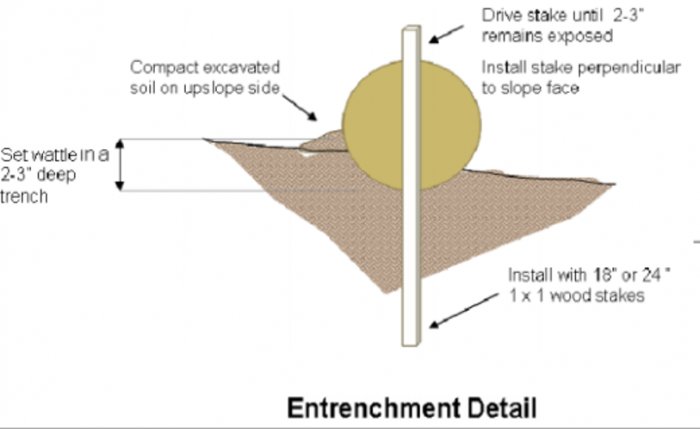
Step 2: Dig a Shallow Trench
When digging the shallow trench for the wattles, it’s best to use a small hand tool like a pick to score the ground. Then you can switch to a shovel to add the right amount of depth. The channels only need to be dug two and five inches, depending on the soil type:
- Soft, loamy soils = 3 to 5 inches deep
- Hard, rocky soils = 2 to 3 inches deep
The trenches need to be placed on the uphill—also called the flow side—so that the wattles can catch the water accurately.
Step 3: Lay the Wattle
Wattles need to fit snugly in the trench so that there is no visible daylight coming from underneath. Once you install the wattle into the channel, move the extra soil, and pack it firmly against the wattle on the uphill side.
When placing the rest of the wattles, make sure that they are butted firmly and tightly to each other but do not overlap. If they overlap, there could be room for sediment or runoff to go through.
Step #4: Use Wooden Stakes
To keep the wattles in place, you’ll use wooden stakes that drive through the wattle and into the ground. The number of stakes you’ll need will depend on how big the wattles are.
- 25-foot wattle = 6 stakes
- 20-foot wattle = 5 stakes
- 12-foot wattle = 4 stakes
These stakes should be driven firmly through the wattle and into the ground with two to three inches left above. If they are forced too low, sediment flow could pick off the stakes, meaning these were not installed correctly. You may need a pilot bar to get the stakes through rocky soils.
Conclusion
Straw wattles are great, low-cost alternatives to silt fences and straw bales when it comes to preventing soil erosion, sediment control, and increasing ground infiltration. They are also biodegradable, can last up to two years in prime shape, and are simple to install on almost any type of slope.
Whether you are running a construction site, an agricultural farm, or are rehabilitating land and habitats, straw wattles might be the perfect thing to complete your project—and Granite Seed has what you need. With more than 30 years of experience in erosion control, Granite Seed can provide wattles and several other erosion prevention tools for any plan of action.